Iris 2.0 Troubleshooting Guide

Iris 2.0 Troubleshooting Guide

Digital Doc's Iris 2.0 Troubleshooting Guide

Unknown Device
When connecting the camera you receive the prompt ‘This Device is not Recognized”. This moniker is assigned to the camera by Windows when the device cannot effectively communicate with the operating system and is generally hardware related. This is caused by a poor connection to the Iris. The symptom may resolve in a few different ways. Switching the camera to an alternate USB port directly on the computer tower will eliminate any external connection sources as the root of the problem. Should the issue persist with a direct connection to the computer, the camera’s cable may have sustained internal damage or wear. Switching to a secondary cable will confirm. If the issue persists in several connections with different camera cables, likely the problem is an internal component of the Iris. In this scenario please contact Digital Doc Technical Support or Customer Service for Camera Repairs.  

Open_Cam
An Open_Cam error is generally thrown by the Iris Driver in 2 situations. A Windows update or another application may have nullified a camera color property. Please use Video Settings Adjustment utility and select a color scheme preference. After selecting apply, the camera should be ready to operate again. Should the issue persist after this step, the Iris camera may have insufficient power delivery to the optical sensor in the device. To resolve this we must attempt to supply the camera with adequate power. the 3 steps in this are disabling integrated Windows Power Management for USB devices, bypassing extension solutions, and ensuring the use of a USB 2.0 port. For ease in the first of these steps, please use the Digital Doc USB Controller Management utility. 

Capture
The Iris 2.0 Camera Capture buttons communicate through a Game Controller called ‘NET Virtual Joystick’. In some applications this needs to be manually mapped, a simple preference change can resolve the issue. Please refer to the integration guide for your installed Dental Imaging Application. If the issue persists after this, please try to re-install the camera’s drivers, ensuring to run the installer with Administrative Permissions.
Most Dental imaging software will listen for this button press natively, however some require additional software to run in the background. The capture scripts are located at ‘C:\Program Files (x86)\Digital Doc\scripts‘ or ‘C:\Program Files\Digital Doc\scripts‘ for a 32-bit system. After manually running a script, and verifying that it returns function to the camera’s capture buttons, place a copy or shortcut of the script in the windows startup directory.  

Blank Screen
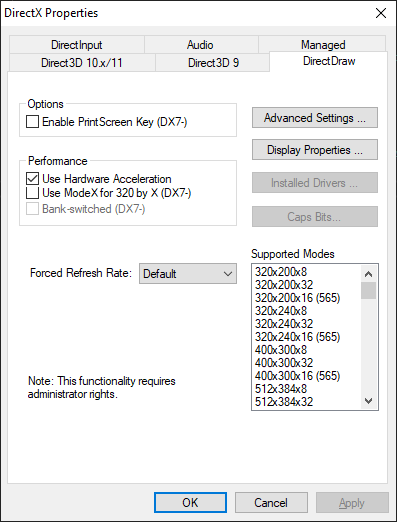
A blank screen can be caused by Hardware Acceleration on DirectDraw within Windows. To disable this feature, please run the Microsoft utility DXCPL, select the ‘DirectDraw’ tab and uncheck the box for ‘Use Hardware Acceleration’. Digital Doc has developed its own solution for this issue as well called DisableHardwareAcceleration. Run Digital Doc’s tool as Administrator to have the fix applied automatically. Afterwards, restart the video stream to verify the issues resolved.   

Dll is Missing
This error message indicates that the Iris camera is installed and registered as an available video device, but the driver for the camera has not loaded on the hardware. Please verify the camera is connected and populating in the windows device manager under the category ‘Imaging Devices’. If the Iris is loaded and you experience this error, please contact Digital Doc Technical Support for assistance.

No Device found
this is very similar to the ‘.dll is missing’ error except that the problem is occurring without the camera registered as an available device. After verifying the connect of the Iris Camera, please run the Refresh Driver tool located in the Windows Start Menu under Digital Doc. 

If after attempting these steps and the issue(s) persist, please reach out the Digital Doc Technical Support for assistance.

Black Screen

Black Screen

Black Screen Error

A black screen generally means that the application is not recognizing a signal from the camera.


Check to make sure that the camera is attached to computer and powered on.

If unsure, remember that the camera’s LEDs always illuminate during the initial powering on of unit.


Check to be sure that the camera is the selected/preferred windows video device.

This can be done in videoview > devices > Iris

Be sure that the video settings are properly configured. This can be done in VideoView and/or your imaging software.


Some software applications require that you direct their input to a specific video device or driver.

Refer to specific software setup instructions if unsure about this.


Some applications will display a black, blue or green screen if a video capture card is installed.

Capture cards can sometimes be successfully disabled in device manager–reboot to be sure.

Otherwise, device needs to be removed in device manager, then physically removed from system.


This can be sometimes attributed to the hardware acceleration settings of the video controller.

This has presented itself in computers using an ATI  video cards, Macintosh computers running Windows, and in Dimaxis software.

A symptom of this sometimes has been a frame of video only when the capture button is depressed.

Hardware acceleration is automatically disabled by using the Iris Camera Installer  and can be Manually disabled using a utility from Microsoft DXCPL by unchecking ‘Use Hardware Acceleration’ under the ‘DirectDraw’ tab.


Error Open Cam

Error Open Cam

Digital Doc Error Open Cam

In certain applications, most frequently in Kodak Dental Imaging and Carestream, an “Error: Open Cam” message will appear.
This usually occurs when the imaging component is opened and the Iris camera is not connected.


It is often hidden behind other active windows and does not allow the selection of other items within application.

Sometimes the window will recreate itself each time the mouse is clicked elsewhere.

The solution to this issue is to install the appropriate PnP Service Update.

PnP Service Update for Red Dot Icon Camera.

This Service is included with the Iris Camera Installer.


These errors may be caused by power management settings in the Windows Operating System.

The USB Selective Suspend setting can be disabled using a tool included with the Iris Camera Installer called “USB Power Management”.

This tool can be found in: Start Menu>Programs>Digital Doc>Utilities>USB Power Management.


Another cause could be related to the power supplied from the USB port itself.

Digital Doc recommends connecting the Iris Camera through an externally powered USB hub.

These hubs are available for purchase through major dental distributors. Not all hubs are created equal,

please contact your preferred dental supplier for more information on Digital Doc USB Hubs (Part#: 4011565)

Digital Doc Powered Hub


USB PVR-TV Device

USB PVR-TV Device

USB PVR-TV Device Error

The camera installing as a USB PVR-TV device is a common problem; it is the driver set that Windows Update assigns to Empia 28** based devices when installing automatically. The reinstallation of the device may occur due to cables being moved, hubs being installed, etc. On occasion, it has also been observed that Windows Update running with camera connected will reassign the drivers to the device. Once installed as a USB PVR-TV device, this can take precedence over the correct driver set and require the re-installation of the camera — regardless of location. If this happens repeatedly in your installation, there are a few steps that can be taken to be sure it is permanently resolved.

Whenever any system-wide changes are made, or hardware is installed, be sure that the user logged into the computer has administrative rights.

Go to Windows Update Hardware Settings in Computer Properties and be sure the computer will not automatically connect to Windows Update for drivers.

(Right Click “My Computer” → Select “Properties” → “Hardware” Tab → “Windows Update” Button → select “Never search Windows Update for drivers”)

Alternatively, you may choose “Ask me to search Windows Update every time I connect a new device.”

The issue is if someone were to select “Next” in a Hardware Wizard without reading all of the information, the device would likely install incorrectly again.

The next step is to delete the .inf and .pnf files from Windows so the machine does not see the camera as a PVR-TV device any longer.

Browse to the “inf” folder in the Windows directory — this is typically “C:\WINDOWS\inf”.

You may need to go to “Tools” → “Folder Options” → “View” Tab → and select “Show hidden files and folders”

You may also need to uncheck “Hide extensions for known file types” if checked within same window.

The .inf file for the PVR-TV device will have filename “oemX.inf” where “X” is a one or two-digit number.

Start opening .inf files (they will open in Notepad by default) beginning at the end (X=largest number) until you find the correct file.

The beginning will look like this:


;——————————————————————

;

;   emBDA.inf — This file contains installation information for

;                eMPIA USB 2.0 Video Devices EM28xx.

;

;   This installation is for Windows XP only.

;

;   Copyright (C) eMPIA Technology, Inc.  2002-2006

;

;——————————————————————


Delete this file and the .pnf file of the same name.

Windows will no longer “recognize” the camera as the PVR-TV device once uninstalled and/or updated to another device.

Update the PVR-TV Device drivers to the correct NET_2860 Device drivers from Digital Doc.

It may very well be worth the extra minute or two to update the drivers on all possible ports (all four in powered hub, the two on front of tower, etc)

This way you will not receive any New Hardware notifications (or background installations) at all.

If done correctly, after the initial driver update (first port), you should be able to let Windows install the device automatically.

Error Code 52

Windows Update KB3004394, released on 12/10/2014, has been causing issues on some Windows 7 mac hines running Service Pack 1.

When attempting to install devices, the user may encounter an error regarding the signatures for the device drivers (Code 52).

This is an issue with the Microsoft Root Certificate Update, not with your device’s drivers.

Windows Defender has also been reported to stop working, and many users are now receiving UAC prompts unexpectedly.

It may also disable the ability of Windows to download and install future updates. http://support.microsoft.com/kb/3024777

Searching Windows Update for KB3024777 and installing it should resolve the issue, effectively removing KB3004394.

Alternatively, KB3004394 can be manually removed through Programs and Features or through Windows Update in Control Panel.

In any case, the device(s) will need to be uninstalled and reinstalled again after resolving the issue with the patch.